Thứ Tư, 4 tháng 12, 2013

Cài font tiếng Trung dễ dàng trên Win XP


Cài font tiếng Trung trên máy tính của mình hiện đang dần trở nên phổ biến hơn, do nhu cầu học tiếng Trung, làm việc bằng tiếng Trung mà máy tính bạn phải trang bị font chữ cho ngôn ngữ này. Sau đây sẽ hướng dẫn các bạn cài font chữ tiếng Trung trên đa nền hệ điều hành Win XP, Win 7, Win 8
Trên Win XP:
Download bộ font cho XP tại đây: 

Các bạn giải nén LanguageFiles.rar vừa down về sẽ ra một folder LanguageFiles. 
Đầu tiên các bạn vào Control Panel -> Regional and Language Options. Chuyển sang tab Language.
Sau đó các bạn tích vào lựa chọn Install files for East Asian Languages nó sẽ bắt bạn Insert đĩa cài, nhg đừng lo, bạn chọn Ok, sau đó Browse đến đường dẫn Folder LanguageFiles vừa giải nén,


Trỏ đường dẫn đến file IMJPCIC.DL_ , Sau đó chọn Ok để mở file


Sau đó chọn Apply và Restart computer để quá trình cài đặt đc hoàn tất. Như vậy là các bạn đã cài đc font tiếng Trung trên chiếc máy của mình rồi đấy 


B2: Chọn Regional and language (Classic)

Hoặc chọn 
rồi chọn 
B3: Chọn tiếp thẻ Languages

Ctick vào Install files for East Asian languages

Bảng cảnh báo hiện lên, nhấn OK để xác nhận
Nhấn tiếp Apply

Khi đó máy yêu cầu đưa dĩa Win XP vào
B4: bạn cần chỉ ra nơi chứa thư mục Language trên CD

Tiến trình cài đặt bắt đầu. Khi đã xong, đề nghị bạn khởi động lại máy

B5: Tiếp tục vào lại phần Language, chọn thẻ Settings

Nhất nút Add, một khung khác hiện ra cho bạn chọn ngôn ngữ.

Ở đây mình chọn tiếng Hoa giản thể Chinese (RPC)
*Nếu bạn muốn gõ chữ phồn thể thì chọn Chinese (Taiwan)
=> Đến đây là chúng ta đã xong phần cài font. Tiếp theo sẽ là bộ gõ
B1: Trong phần Input Language, các bạn chọn bộ gõ là Microsoft Pinyin IME 3.0

(Ở đây giới thiệu nhập liệu bằng phiên âm, sau này sẽ giới thiệu cách nhập khác)
Bạn cũng có thể tham khảo những tùy chọn sau trong phần General của Pinyin

Để chuyển đổi qua lại giữa hai bộ gõ (Anh-Hoa hoặc Việt-Hoa), các bạn nhấn tổ hợp phím Left (Alt+Shift)

Tuỳ theo thiết lập ban đầu của hệ thống mà bộ gõ nằm trên taskbar hoặc “lơ lững” như thế này (nếu trong Control panel ta chọn phần mở rộng, “Turn off advanced text service”)

Bạn có thể chỉnh lại trong phần setting > Language Bar.

Thứ Sáu, 15 tháng 11, 2013

Thứ Năm, 10 tháng 10, 2013

create usb install windows 8 uefi

To Manually Create a Bootable UEFI USB Flash Drive

1. Connect the USB flash drive.

2. Open an elevated command prompt in Windows 7 or Windows 8/8.1.

3. In the elevated command prompt, type the commands below one at a time and press Enter after each one. (see screenshot below step 5)

  • diskpart
  • list disk

4. Make note of the Disk # (ex: Disk 4) for the USB flash drive. (see screenshot below step 5)

warning   Warning
It is critical that you use the correct disk #. If you do not, then you could delete the wrong drive below and lose everything on it.


5. In the elevated command prompt, type the commands below one at a time and press Enter after each one. (see screenshot below)
NOTE: Substitute # in the first command with the actual disk # from step 4 above. For example:select disk 4

  • select disk #
  • clean
  • create partition primary
  • format fs=fat32 quick
  • active
  • assign
  • list volume
  • exit

Click image for larger version

Thứ Tư, 9 tháng 10, 2013

word 2003 cant see wordArt just a square

tool/option/view
uncheck Picture Placeholder 

How to Install Bluestack on 1 GB RAM

http://www.youtube.com/watch?v=sUy0Y3i8zyA

use orca
edit msi file

(remove vga check :CheckIfGlSupported)

Hướng dẫn cài driver Intel 4 series express chipset family trên Windows 8 Pro 64 bit.

Tình hình là vừa cài mới mày mình với windows 8 bản pro 64 bit lên con laptop dell vostro 1014 của mình.
Mặc dù driver màn hình đã được nhận đầy đủ nhưng phần driver màn hình onboard của mình là Intel 4 series express chipset family được windows 8 mặc định cài bằng driver Intel 4 series express chipset family cập nhật từ Microsoft. Điều này thì hoàn toàn thuận lợi cho người dùng. Nhưng không phải là hữu hiệu vì bản driver này không phù hợp với 1 số game (Ví dụ như trường hợp của mình là MUVN).
Như vậy thì làm thế nào để cài driver Intel 4 series express chipset family trên Windows 8 ? Không hề đơn giản như trên windows 7. 
Nếu các bạn install driver từ intel thì sẽ nhận được thông báo giống như: This computer dose not meet minimum requirement install the software o.O
Còn nếu dùng thủ thuật "Have disk" thì cũng thất bại vì mỗi lần uninstall driver màn hình trong devides manager thì sẽ được windows cài lại ngay lập tức.
Sau khi lần mò trên mạng mấy ngày trời mình cũng đã tìm được cách ép windows 8 chấp nhận driver tải từ intel :D 
Để làm việc này các bạn cần thực hiện như sau :

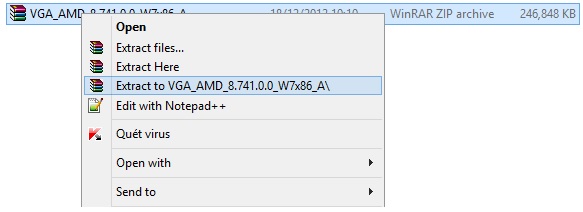
1- Tải bản driver dạng file zip từ intel. Sau đó giải nén ra thư mục 
Bạn có thể tải bản driver 64 bit tại đây hoặc bản 32 bit 
2- Tìm trong bộ cài đặt file igdlh64.inf
3- Mở file đó lên bằng notepad và edit đoạn code sau:


4- Thay thế đoạn bên dưới [Manufacture] bằng đoạn sau: 
[Manufacturer]
%Intel%   = IntelGfx, NTamd64

[IntelGfx.NTamd64]

5- Lưu file lại.
6- Bật Test Mode của windows 8 bằng cách dùng quyền admin để mở CMD. Nhập 2 dòng code sau - nhập từng dòng rồi enter nhé.
bcdedit -set loadoptions DISABLE_INTEGRITY_CHECKS
bcdedit -set TESTSIGNING ON

7- Bạn sẽ nhận 2 thông báo thành công.
8- Khởi động lại máy
9- Cài đặt driver bằng cách chạy file cài đặt driver (Có thể bạn sẽ nhận được 1 thông báo màu đỏ  -> Chọn install anyway)
10- Cài xong thì bạn restart máy
11- Trả windows 8 về mode bình thường bằng 2 dòng code :
bcdedit -set loadoptions ENABLE_INTEGRITY_CHECKS
bcdedit -set TESTSIGNING OFF

Như vậy là bạn đã hoàn tất công tác cài driver khó nhằn trên windows 8 rồi nhé. Up để các bạn không phải tốn công tìm như mình ^^.

Chúc các bạn thành công :)


bluestack app tested

PVZ2 mod version
Fieldrunners 2
Fieldrunners
glow hockey 2
glow hockey
paper toss
drag Racing
x construction
Sleepy Jack
world of Goo
Rolling the hole
Gun'n'Glory
Defender
Defender 2 1.32 mod
fishing joy
Ninja fruit
angry birds space
air attack HD
Small street

9 Innings Pro Baseball 2011

tiny farm
slice it
islash
cut the rope
cat in the hat lite
dragon fly
shine runner
sprinkle
Minion Rush
where my water 2 (lag)
uno hd not working
bridge construct not working
sky safari not working
run sheldon not woring
squids
clash of clan not working
zombiewood  not working
IceAge Village

bluestacks rooted version, vga not compatible fix

this version buestacks is already in the Root and modified byBayu Kurniawan 

extract using 7zip . 
extract iso file 

install SetupLS.exe if your vga is not compatible (but some app like PVZ2 , Fieldrunners 2 cant run )
setupHS. if your vga has openGL 2.0 and Above

recomend : 512 mb Ram minimum.

donwload link:
http://skip.inwepo.com/q

source:http://download.inwepo.com/2013/07/bluestacks-build-0714901-rooted-version.html

Thứ Tư, 25 tháng 9, 2013

avlgo for windows 7

after have avlgo.bin


or use command (run as administrator)
bcdedit /create /d "start avlgo" /application bootsector
bcdedit /set [id] device boot
bcdedit /set [id] device path \Avldr.bin
bcdedit  /displayorder [id] /addlast


Thứ Năm, 19 tháng 9, 2013

mtd Dictionary or some dictionary program cant speech , Từ điển MTD hoặc 1 số từ điển khác không thể phát âm

lỗi : do  text to speech engine bị lỗi hoặc thiếu
cách sửa : chọn   text to speech engine khác
cause: text to speech engine lost or error
solve : change text to speech engine


Thứ Bảy, 7 tháng 9, 2013

windows xp dont save password network logon

http://support.microsoft.com/kb/264033
  1. Rebuild the protected storage. To do this:
    1. Start Internet Explorer, and then click Internet Options on the Tools menu.
    2. Click the Content tab, and then click AutoComplete.
    3. Click Clear Forms, and then click Clear Passwords.
    4. Click OK, and then click OK.

Thứ Năm, 5 tháng 9, 2013

dell 15 r n5110 windows 8 black screen

go to safemode
disable video card intel hd 3000
update lastest bios  : ftp://ftp.dell.com/folder00799835M/1/N5110A11.EXE
enable video card

Thứ Tư, 4 tháng 9, 2013

Cách cài chế độ hai card màn hình (switchable graphics) trên win 8

Chế độ hai card đồ họa song song (Switchable Graphics) thường được tích hợp trên một số laptop đời mới. Chức năng chính là tự động chuyển đổi sang card đồ họa rời khi máy tính có nhu cầu về đồ họa (chạy phần mềm thiết kế, xem phim HD, chơi game...) Còn thông thường máy sẽ sử dụng card đồ họa onboard để tiết kiệm điện cũng như tăng tuổi thọ cho card đồ họa rời. Ngoài chức năng tự động bạn cũng có thể lựa chọn thủ công cho những ứng dụng cần đến card đồ họa rời. Giúp bạn chủ động hơn.

Lưu ý: Trước khi cài driver cho card đồ họa rời, bạn phải chắc chắn là mình đã cài xong driver cho card dồ họa onboard.

1. Đối với máy tính sử dụng card ATI (ATI + Intel)

Bạn tiến hành lên trang chủ của hãng laptop. Download bộ Driver dành cho win 7. Nhớ chọn phiên bản 32bit hoặc 64bit phù hợp với bản windows đang cài. Một số trang download của các hãng laptop.

HP: http://www8.hp.com/vn/en/support-drivers.html
Dell: http://www.dell.com/support/drivers/us/en/19/drivershome/showproductselector
Acer: http://www.acer.com.vn/ac/vi/VN/content/drivers
Toshiba: http://toshiba-asia.com/support/drivers
Samsung: http://www.samsung.com/vn/support/main/supportMain.do?supportIaCode=10004 

Sau khi download được driver, bạn tiến hành giải nén bằng WinRAR (Lưu ý: Giải nén chứ chưa cài ngay - Xem hình minh họa)

Giai-nen-drivers
Bước tiếp theo bạn tiến hành mở thư mục vừa giải nén. Click chuột phải lên file setup chọn Properties

Cai-driver-ati
Chuyển quan tab Compatibility chọn như hình và Apply > OK

Cai-driver-ati-2
Tiến hành cài đặt bình thường, sau khi cài đặt bạn có thể sử dụng chế độ Switchable Graphics bình thường mà không gặp phải các vấn đề nào khác. Thao tác như hướng dẫn trên nhằm sử dụng driver của win 7 tương thích trên win 8.

Cai-driver-ati-3
Cai-driver-ati-4
2. Đối với card Nvidia Geforce (Geforce + Intel)

Đối với dòng card đồ họa Geforce thì đơn giản hơn. Bạn chỉ cần lên trang chủ của hãng theo đường link sau: http://www.nvidia.com/Download/index.aspx?lang=en-us tiến hành lựa chọn dòng card, model card và hệ điều hành đang dùng (Windows 8)

Download-drivers-nvidia
Sau khi cài đặt, bạn có thể sử dụng được chế độ switchable graphics thông qua trình quản lý của Nvidia

Nvidia-control-panel

http://suamaytinhhcm.com/tin-tuc-va-thu-thuat/thu-thuat-may-tinh/cach-cai-che-do-hai-card-man-hinh-switchable-graphics-tren-win-8.html

Windows 8, Black screen upon boot


You have to go into safe mode. If you can't update windows in safe mode, then you need to disable the intel HD graphics in device manager, reboot normally, and then it should not give you a black screen. Then you want to run the windows updates. After that, go back into safe mode and re-enable the Intel HD graphics and reboot. I hope it works for you and I really hope you can understand what I am saying. I am not the best writer. Haha
Also, you should still update your drivers as well.

Thứ Ba, 14 tháng 5, 2013

Attachments Not Visible to Some Recipients

http://support.microsoft.com/?scid=kb%3Ben-us%3B197066&x=8&y=10


Turn off TNEF (AKA winmail.dat) in Outlook

I hate that Outlook doesn't send proper emails and always seems to want to put emails inside a winmail.dat attachment. Even though most mail clients/anti-virus/anti-malware products now understand it, I still prefer to turn off the setting in Outlook and let it revert to “standard” formatted emails…

Outlook 2007

Windows Registry Editor Version 5.00

[HKEY_CURRENT_USER\Software\Microsoft\Office\12.0\Outlook\Preferences]
"DisableTNEF"=dword:00000001

Outlook 2010

Windows Registry Editor Version 5.00

[HKEY_CURRENT_USER\Software\Microsoft\Office\14.0\Outlook\Preferences]
"DisableTNEF"=dword:00000001

Thứ Tư, 27 tháng 3, 2013

không thể set default printer windows xp

do key HKCU\Software\Microsoft\Windows NT\CurrentVersion\Windows\  bị giới hạn quyền 
do virus

vào key security set permission  cho toàn quyền


Thứ Sáu, 15 tháng 3, 2013

VEN = 8086 & DEV = 1E3A is Intel Management Engine Interface

http://downloadcenter.intel.com/confirm.aspx?httpDown=http://downloadmirror.intel.com/21888/eng/MEI_allOS_8.1.0.1252_PV.exe&lang=eng&Dwnldid=21888

Thứ Tư, 13 tháng 3, 2013

íntall infinidock ios 4.2.1

cydia : change to develop
install icon Support

and install this deb file :


https://www.box.com/s/pqaf09udt91g054ynjoj

không thể kết nối có thể ping ,cant browse but ping local network

tạo file hosts  trong c:\windows\system32\driver\etc ( nếu bị mất)
vào run  : cmd


netsh winsock reset
khởi động lại 


create hosts  file in c:\windows\system32\driver\etc (if missing)

open run dialog:
cmd
netsh winsock reset
restart computer

Thứ Ba, 5 tháng 3, 2013

direct install ipa on ios6

cydia :add source : cydia.myrepospace.com/ilex

install package : ilex Ipa Installer
respring

copy  ipa files (use ifile ) to :/var/mobile/Media/general_storage

run ilexipa


Thứ Năm, 3 tháng 1, 2013

excel vba function Rank2


Function RANK2(value As Double, R As Range, order As Integer) As Integer
Dim a(1000) As Double
Dim n As Integer
Dim i As Integer
Dim k As Integer
Dim tam As Double
n = 0
For i = 1 To R.Rows.Count
    If n > 0 Then
        For k = 1 To n
         If R.Cells(i, 1) = a(k) Then
            GoTo tiep
         End If
        Next k
    End If
   
    n = n + 1
    a(n) = R.Cells(i, 1)
tiep:
Next i
For i = 1 To n - 1
    For k = i + 1 To n
        If a(i) > a(k) Then
        tam = a(i)
        a(i) = a(k)
        a(k) = tam
        End If
    Next k
Next i

For i = 1 To n
    If value = a(i) Then
    If order = 1 Then
    RANK2 = i
    Else
    RANK2 = n - i + 1
    End If
   
    End If
Next i

End Function